Updates:
- Feeds Image Grabber has been released to support the new Feeds module. (3 march 2010)
- Tutorial for Feeds Image Grabber (FIG) published. (6 march 2010)
- Demonstration Website is available here. (6 march 2010)
I get a lot of requests for this, so here is a tutorial explaining the 3 W’s (What, Why and How) of FeedAPI ImageGrabber.
Motivation
[caption id=“attachment_258” align=“aligncenter” width=“570” caption=“a feed item from google reader”] [/caption]
This is a screenshot of a news item from my Google Reader. Anyone who has a moderate knowledge about the feeds would know that the image on the left in the above news-item is actually not published with the feed.
In other words, If you refresh any feed on your Drupal website using FeedAPI, you won’t get the image in the posts, unless they are published along with the feed which is quite rare.
The purpose of FeedAPI Imagegrabber is to make the feed more informative as well as interesting for the user. As, we all know that “comics are much better than novels”, this module appends the feed-item with an appropriate image from its content URL. The goal of the FeedAPI ImageGrabber is to mimic the thumbnail display of Google Reader for the feeds on your Drupal website.
As soon as you refresh the feed, ImageGrabber automatically attaches an appropriate image from the original article to the feed-item node on your website. You don’t even have to press an extra button!!
How it works A classic method of mimicking the behavior of FeedAPI Imagegrabber will be to do the same thing manually. Let us go through the procedure if you were to do it manually:
- Refresh the feed.
- For each feed-item, go to their respective original URL and save the image to display.
- For each node, crop the image, convert it into a thumbnail and then upload it in an CCK imagefield.
FeedAPI Imagegrabber automates the last 2 steps of the three step process described. You just need to refresh the feed and the ImageGrabber do the rest for you. The most difficult part which only humans can do is to select an appropriate image, for which I am constantly improving on the heuristics.
Download and Install Download the latest release of FeedAPI ImageGrabber, compatible with your Drupal release, from the project page. Uncompress the folder in your site’s module directory and enable it from the admin/module page.
You are now ready to create new feeds with ImageGrabber enabled.
Next, you must install the following modules to get going:
- Imagefield
- Filefield
- CCK
You must then decide the content type for your feed-items for a particular feed and add CCK imagefields to that content type, before proceeding.
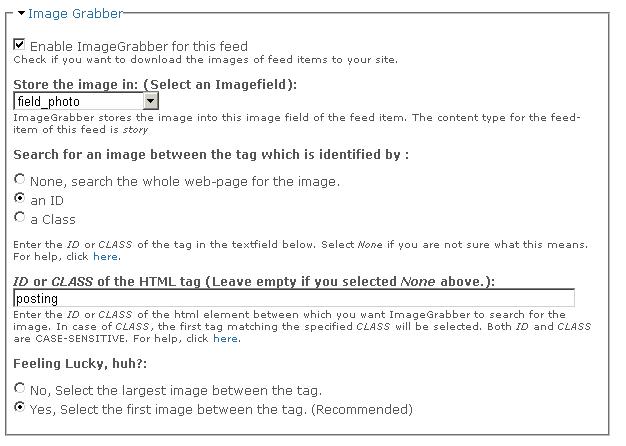
Form User Interface You can enable the ImageGrabber for the feeds you want to download images for. When you add or edit any feed (i.e. feedapi enabled node), you will see the following additional settings for ImageGrabber:
[caption id=“attachment_267” align=“aligncenter” width=“626” caption=“Form Interface for ImageGrabber”] [/caption]
Here is an detailed explanation of the input fields:
- Enable ImageGrabber: Check this box if you want to enable ImageGrabber for this particular feed.
- Select image field: ImageGrabber stores the downloaded image in a cck imagefield. You must select one of the imagefield from the drop-down menu.
If you receive this message “There are no imagefields associated with the ‘abcd’ content type.” , then you must add imagefield to the content type mentioned or change the content type of the feed-items to the one which has imagefields associated with it.
-
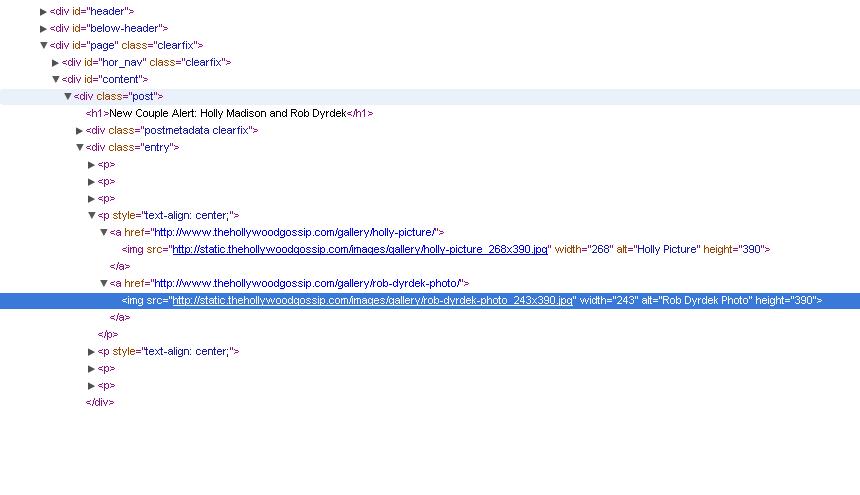
Search for an image between the tag identified by: To understand this, consider that the every feed-item associated with a particular feed has the following structure (HTML source code):
[caption id=“attachment_282” align=“aligncenter” width=“508” caption=“HTML source code of a feed-item webpage”]
 [/caption]
For the above example, we know that the images associated with this particular post will always be within the [cc lang=“html”]
…
tag[/cc] Therefore, for this feed you must select the ‘class’ option here and enter ‘post’ in the text-field. Similarly, you must find out one such tag from the feed-items of the feed you want to create, see if it is identified by an id or an class. Then, select the appropriate option and enter the class or id in the text-field below. If you select None, the default tag will be ‘body’.
simple way to find the id or class: Just find out the title of your article in the source code, and start looking for its parent/grandparent tags. Select the nearest parent which has an id or class.
Now ImageGrabber will look for the images just between this tag, hence eliminating the download (and selection) of images in the sidebar or the header advertisement.
-
Enter the id or class (whatever you selected) in the text-field. Leave it empty if you selected the None option above.
-
Feeling Lucky: This has definitely been borrowed from the big devil Google. It will just select the first image it encounter between the tag specified, if ‘feeling lucky’ option is selected. Otherwise, it will select the largest image between the tags. I would personally recommend you to try out the ‘feeling lucky’ option as it helps saving a lot of bandwidth!! But if it doesn’t work for you, select the otherwise.
When you are done, just refresh the feed and you will see the images attached to the feed-item nodes.
Note: You can also modify your theme a little to get the Google Reader look in which the image floats on the left of the feed-item.
After refresh, you might get the following warning:
ImageGrabber: PHP execution time limit for system is 30 seconds, due to which images for some feed items couldn’t be downloaded. Please click on ‘Grab Images’ to refresh those feed-items.
If you get such a warning, no need to get afraid, just click on ‘Grab Images’ and the remaining feed-items will have their images as well. You may get multiple warnings depending upon your system’s execution time.
Enjoy grabbing images!!
Do leave a comment about this tutorial. Please make support and feature requests using support forums only.